Snow Ice Cream Recipe: 5 Magical Ways to Make Winter Treats
"A fun and magical snow ice cream recipe that turns fresh snow into a creamy, dreamy winter treat! With just a few simple ingredients like milk, sugar, and vanilla, plus creative topping ideas, this dessert is perfect for snowy days. Quick, easy, and family-friendly—it’s the ultimate way to enjoy winter!"
Equipment
- 1 Large mixing bowl Use a stainless steel or glass bowl for best results. Chill it beforehand if possible.
- 1 Small mixing bowl For preparing the milk, sugar, and vanilla mixture.
- 1 Whisk or spoon To mix the sweet base until sugar dissolves.
- 1 Measuring cups and spoons For accurate measurements of milk, sugar, and snow.
- 1 Spatula or large spoon To gently fold the snow into the sweet base without overmixing.
- Optional Airtight container For storing leftovers (if there are any!).
Ingredients
- 8 cups Fresh, clean snow Use freshly fallen, white, fluffy snow. Avoid dirty or yellow snow.
- 1 cup Milk Whole milk is ideal, but 2%, almond milk, or any milk works too.
- ⅓ cup Granulated sugar Adjust to taste if you prefer it sweeter.
- 1 teaspoon Vanilla extract Pure vanilla extract gives the best flavor, but imitation works fine too.
- Optional Varies Toppings Examples: chocolate syrup, crushed cookies, sprinkles, or fresh berries.
Instructions
Scoop the Snow
- Head outside and gather 8 cups of fresh, clean snow in a large mixing bowl. Look for fluffy, untouched snow—avoid any yellow or dirty patches. Bring it inside quickly to keep it cold while you prepare the rest of the recipe.
Prepare the Sweet Base
- In a small bowl, whisk together 1 cup of milk , 1/3 cup of granulated sugar , and 1 teaspoon of vanilla extract until the sugar dissolves completely. Taste the mixture and adjust the sugar if you’d like it sweeter.
Combine the Snow and Base
- Pour the sweet milk mixture over the snow in the large bowl. Using a spatula or large spoon, gently fold everything together until the snow is evenly coated and the texture resembles soft-serve ice cream. Be careful not to overmix, or it may turn slushy.
Add Your Favorite Toppings (Optional)
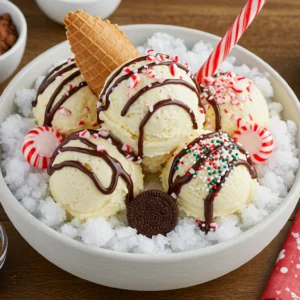
- Customize your snow ice cream with toppings like chocolate syrup , crushed cookies , sprinkles , or fresh berries . Drizzle, sprinkle, or mix them in as desired to create your perfect winter treat.
Serve Immediately
- Scoop the snow ice cream into bowls or cones and enjoy right away while it’s still frosty and fresh. If you have leftovers, store them in an airtight container in the freezer, but note that the texture may harden over time.
Notes
-
Snow Safety First:
Always use freshly fallen, clean snow that is free from dirt, debris, or animal tracks. Avoid snow near roads or industrial areas to ensure it’s safe to eat. -
Customize the Sweetness:
Adjust the sugar to your taste. Start with 1/3 cup and add more if you prefer a sweeter treat. Alternatively, reduce the sugar for a less sweet version. -
Milk Options:
- Use whole milk for a creamier texture.
- For a lighter option, try 2% or skim milk.
- For a dairy-free version, substitute with almond milk, oat milk, or coconut milk.
-
Flavor Variations:
Get creative with these fun twists:- Chocolate Lovers: Add 2 tablespoons of cocoa powder to the milk mixture.
- Fruity Fun: Stir in 2 tablespoons of strawberry or raspberry syrup.
- Spiced Delight: Sprinkle in 1/4 teaspoon of cinnamon or nutmeg for a cozy flavor.
-
Topping Ideas:
Elevate your snow ice cream with toppings like:- Drizzled chocolate or caramel sauce.
- Crushed cookies (e.g., Oreos or graham crackers).
- Fresh berries or banana slices.
- Sprinkles or crushed peppermint candies for festive flair.
-
Serve Immediately:
Snow ice cream is best enjoyed fresh. If you need to store leftovers, place them in an airtight container in the freezer, but note that the texture may become icy after a few hours. -
Kid-Friendly Activity:
Let the kids help scoop the snow and mix the ingredients—it’s a fun way to make memories on a snowy day! -
Allergy-Friendly Tips:
- Ensure all ingredients (like vanilla extract) are allergen-free if serving to someone with sensitivities.
- Use plant-based milk for a vegan-friendly version.
-
No Snow? No Problem:
If you don’t have access to clean snow, you can mimic the texture by freezing shaved ice or blending ice cubes until they’re fluffy.